1. 마우스 커서 보여주기
캐릭터 기능을 추가하기 전에, 컨트롤러에서 변경해야 할 점이 있다.
블루프린트로 만들었던 프로젝트에서는 마우스 커서의 input 위치를 바탕으로 이동했기 때문에,
플레이어 컨트롤러에서 마우스 커서를 보여주는 설정을 추가해야 한다.
PlayerController의 BeginPlay에서 SetShowMouseCursor로 설정 가능하다.
	// 마우스 커서 보이도록 설정.
	SetShowMouseCursor(true);
2. 캐릭터 input 설정_Move
우선, input과 연관된 캐릭터 행동에는 이동밖에 없어 이동만 우선 구현해 보았다.
다른 행동들은 모두 UI로 델리게이트에 등록할 것이다.
1) 마우스 클릭이 완료된 시점(Trigger되었다 해제된 시점) 상태 확인하기
블루프린트 프로젝트에서는 다음과 같이 마우스 트리거 시점을 활용하여 이동을 제어하였다.

위의 상태들을 받아오는 곳을 확인하기 위하여 InputAction, EnhancedPlayerInput을 타고 갔다.

위의 주석 부분에서 Trigger State에 따른 Input Event를 확인할 수 있다.
	// LastTState	NewTState     Event

	// None		 -> Ongoing		= Started
	// None		 -> Triggered	= Started + Triggered
	// Ongoing	 -> None		= Canceled
	// Ongoing	 -> Ongoing		= Ongoing
	// Ongoing	 -> Triggered	= Triggered
	// Triggered -> Triggered	= Triggered
	// Triggered -> Ongoing		= Ongoing
	// Triggered -> None	    = Completed
위 함수의 호출을 찾아보니, EvaluateInputDelegates에서 찾아볼 수 있었고,
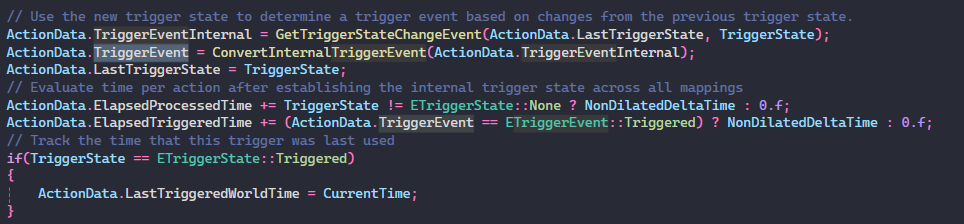
위와 같이 TriggerState를 받아 ETriggerEventInternal enum을 ETriggerEvent로 반환하는 것을 볼 수 있었다.
DirectX에서 InputSystem을 만들 때 알게 된 지식으로 보면,
이전 키 값이 없을 때와 있을 때의 Trigger event가 다른 비트로 지정된다.
Unreal은 여기서 이전 상태가 없을 때와 있을 때 모두 Trigger로 변환하는 작업을 하고 있다.

이 과정을 거쳐 우리가 가져오고 싶던 정보는 ActionData.TriggerEvent안에 있다는 것을 알게 되었다.
이 TriggerEvent는 InputactionInstance라는 구조체 안에 존재한다.

EnhancedInput
결론
CharacterPlayer에서 Character의 SetupPlayerInputComponent를 상속받아 입력 이벤트를 연결해 준다.
EnhancedInputComponent->BindAction(InputAction, ETriggerEvent, CharacterPlayer, &Fuction)으로
설정한 input 이벤트가 발생했을 때, 설정한 함수가 호출되도록 할 수 있다.
void AMABCharacterPlayer::SetupPlayerInputComponent(UInputComponent* PlayerInputComponent)
{
	UEnhancedInputComponent* EnhancedInputComponent = CastChecked<UEnhancedInputComponent>(PlayerInputComponent);

	EnhancedInputComponent->BindAction(MoveAction, ETriggerEvent::Completed, this, &AMABCharacterPlayer::Move);
}
생성자에서 참조 설정.
AMABCharacterPlayer::AMABCharacterPlayer()
{
	// set mapping context.
	static ConstructorHelpers::FObjectFinder<UInputMappingContext> InputMappingContextRef(TEXT("/Game/Blueprints/Inputs/IMC_Character.IMC_Character"));
	if (InputMappingContextRef.Succeeded())
	{
		DefaultMappingContext = InputMappingContextRef.Object;
	}

	// set input action.
	static ConstructorHelpers::FObjectFinder<UInputAction> MoveActionRef(TEXT("/Game/Blueprints/Inputs/IA_Move.IA_Move"));
	if (MoveActionRef.Succeeded())
	{
		MoveAction = MoveActionRef.Object;
	}
}
MappingContext 등록.
void AMABCharacterPlayer::BeginPlay()
{
	Super::BeginPlay();

	APlayerController* PlayerController = CastChecked<APlayerController>(GetController());
	if (UEnhancedInputLocalPlayerSubsystem* Subsystem = ULocalPlayer::GetSubsystem<UEnhancedInputLocalPlayerSubsystem>(PlayerController->GetLocalPlayer()))
	{
		Subsystem->AddMappingContext(DefaultMappingContext, 0);
	}
}
2) 캐릭터 움직이기

마우스를 클릭하면, 해당 지점으로 움직이는 기능을 Move에 추가해야 한다.
마우스 커서 위치를 받아오고 임시로 Location을 이동한다.

void AMABCharacterPlayer::Move(const FInputActionValue& Value)
{
	FVector2D MovementValue = Value.Get<FVector2D>();
	APlayerController* PlayerController = CastChecked<APlayerController>(GetController());
	if (PlayerController)
	{
		FHitResult HitResult;
		PlayerController->GetHitResultUnderCursorByChannel(ETraceTypeQuery::TraceTypeQuery1, true, HitResult);
		FVector CursorLocation = HitResult.Location;
		UE_LOG(LogTemp, Log, TEXT("input value x: %f, y: %f"), HitResult.Location.X, HitResult.Location.Y);
		SetActorRelativeLocation(CursorLocation);
	}
}
실행 화면_이동한 모습

다음에는 실제로 목표 위치와 현재 위치를 보간하여 이동하는 것이다.
'UnrealEngine5 > 프로젝트' 카테고리의 다른 글
| [UE5/LOL] Sobel Edge Filter 만들기 & UV 렌더링 문제 해결 (0) | 2025.05.06 |
|---|---|
| [UE5] Blueprint 프로젝트를 C++로 (4) Animation State Machine, Blend Space와 Blend Node, 완료 (0) | 2025.04.23 |
| [UE5] Blueprint 프로젝트를 C++로 (3) 마우스 클릭으로 캐릭터 이동하기 (0) | 2025.04.22 |
| [UE5] Blueprint 프로젝트를 C++로 만들어보기 (2) (0) | 2025.04.20 |
| [UE5] Blueprint 프로젝트를 C++로 만들어보기 (1) (0) | 2025.04.16 |